|
Welcome to the world of
DASM! For students who want to learn!
|
LINKS |
I Cannot see the text/ image of the Main Menu. |
|

|
UDK3 and Image or Text Widgets problem.
Depending on what
year/date of UDK3 engine you are using I was
contacted by several people who were having
issues with their
keyboard based main menu. At first I had
absolutely no idea what they were talking about
until I duplicated what they were trying to do.
Now, with this error you will not see it within
the UDK editor. But!....as soon as you pack your
project using Frontend and install your project
as an independent software package your main
menu has mysteriously "Disappeared." Wow,
okay?...The good news is, I am going to show you
how to fix this! Download the file below to
begin or have a file of your own. You will need
an image preferably with the dimensions of
1280x720. Resize your image to 1024 x 512
once you are ready. Your image should be "related" to your
project in some way.
DOWNLOAD::
Myudkproject.zip
|
|
|
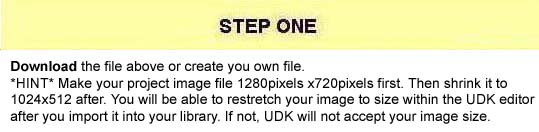
STEP ONE
This was
tested on
UDK-2015-01,
UDK-2013-07 &
UDK-2012-05. Download the file above, or use
your own file with the dimensions of 1024pixels x
512pixels. Unzip the file myudkproject.png.
|
|
|
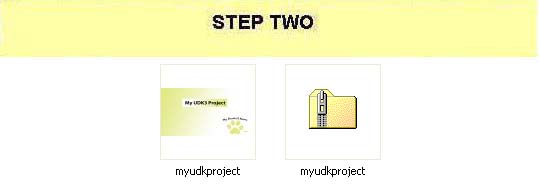
STEP TWO
Unzip the file called "myudkproject.zip" or
prepare your own file. Extract the
myudkproject.png file.
If you do not know how to import images into UDK
click HERE.
|
|

*NOTE* With UDK you can create your own packages
and package names. So this means the default
name is "My package". You can change this
package name at any time.
|
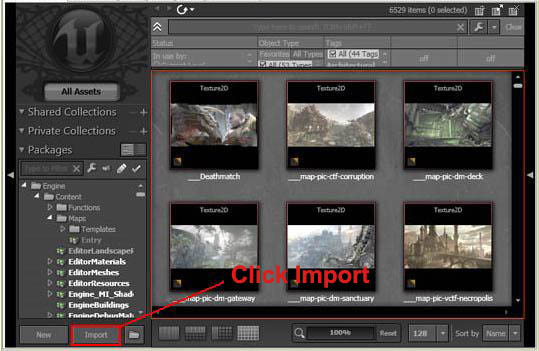
STEP THREE
Now we need to IMPORT the .png image file.
-
Start
UDK
-
Open
the UDK Content Browser (Black icon next to
binoculars.)
-
Click
the Import Button
-
Locate in your PC directory the image
file you want to import.
-
Select
the menu file you want and click "Open"
-
When
the Import window opens click "OK
to All"
-
Go to
File and Save All in the
UDK editor menu
If you are not sure how to import files or
don't even know how to set up the widgets for
images using kismet you will have to read this
tutorial first.
CLICK HERE.
You will now need to create a "Material" out of
the texture you imported.
If you are not sure how to create a material
continue below. If you know how to, use your
texture to create a material, make it Emissive and go
to STEP
FOUR.
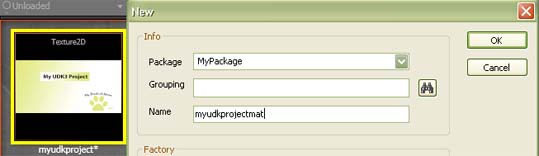
Right click near the file you imported in your
UDK library and a list will appear. Select, "New
Material."
Give the package a name or leave it, this is up
to you. With the "Name", call the file "myudkprojectmat".
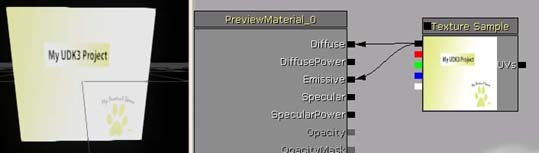
The material editor will open. Move it out of
the way and select the texture you imported
earlier. Go back into the material editor and
press and hold down the "T" key on the
keyboard.
Left click the mouse on an empty space
in the material editor window and your texture
should appear. Connect the black connector to
Diffuse and Emissive.
Click the green tick in
the left corner. Exit material editor by
clicking the red x in the top right corner. Save
any changes. This will be our new material that
we are going to use.
|
|


|
STEP
FOUR
We will need to create a
blank map now.
- Left click File
in the UDK editor and select New
Level...
- Select
Blank Map
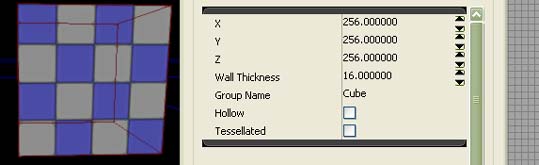
- Create a cube
256x256x256 (This is the default size
anyway.)
- Click
Brush on the
top menu of the UDK editor.
- Select CSG ADD
We should now have a map
with nothing but a blue and white chequered
square in the middle of it with dimensions
of 256x256x256. We will need no lighting at
all for this map because our material is
emissive.
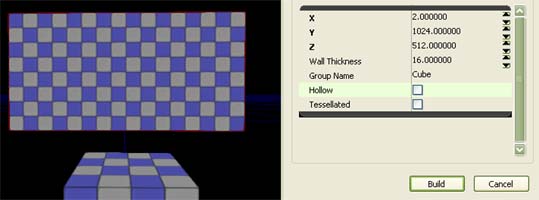
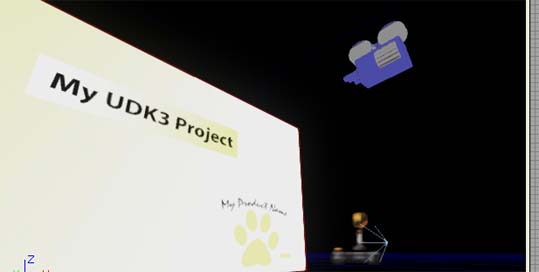
Now we want to create what
I call the "Cinema Screen". This will need
to be in front of the box we created. It
also will need some distance away from the
box we created also, just like a television
set hanging from a wall. If it is in the
wrong place don't worry you can move it
later.
- Select your brush
builder again if it is not selected
already.
- with the x
coordinates type 2
- with the y
coordinates type 1024
- with the z
coordinates type 512
- click build
- move the red
brush builder
rectangle away from the square you
created earlier. (Example in image
left.)
- Click
Brush on the top menu of the UDK editor
- Select
CSG ADD.
|
|

 |
STEP
FIVE
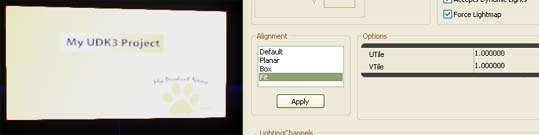
Now we need to add a material texture to the
surface of the rectangle we created. Second, we
need to add a camera actor.
-
Locate the material you created in
Step
Three and select/click it.
-
Select the surface facing the cube you
created earlier by left clicking its
surface.
-
Hold shift and left click the surface you
want the material texture on. Just make sure
the texture is highlighted in the UDK
Browser or this will not work.
-
Left click the surface to select it if not
still selected
-
Right click the surface and select, "Surface
Properties".
-
While the surface is still selected click
"Fit" under alignment.
-
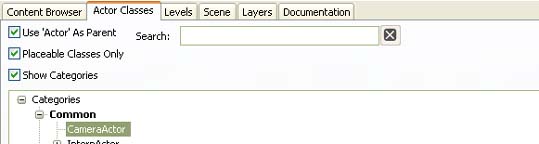
In your Content Browser, click the tab at
the top called "Actor Classes".
-
Under the Categories select "CameraActor"
If you cannot see this option click the +
sign left of the word "Common" to
display it
-
Right click the top middle of the cube you
created earlier and select "Add
CameraActor Here" or drop and drag
it out of the Actor Classes window by
holding down the left mouse button.
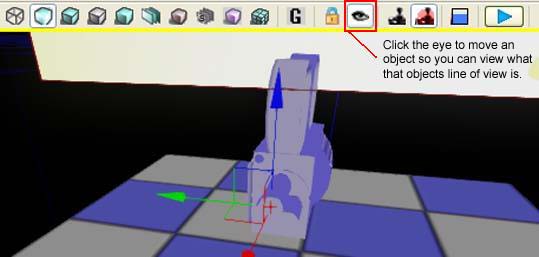
-
Select the camera that you added
-
Click the "Eye" icon located in your UDK
editor in your viewport window. Each
viewport window in UDK has this option.
-
Move the camera so it basically faces the
texture you created earlier.
-
Click the eye in the viewport window again
to turn it off. You should be able to freely
move in the editor again without moving the
camera.
|
|

|
STEP
SIX
It is time now to program the camera.
-
Open Kismet by clicking the green "K" in the
UDK editor.
-
Right click the kismet window and select "New
Event"
-
Select "Level Loaded"
-
Right click the kismet window and select "New
Matinee"
-
Select the camera you want matinee to run
-
Double click the matinee widget to open it
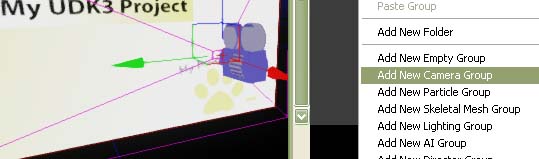
-
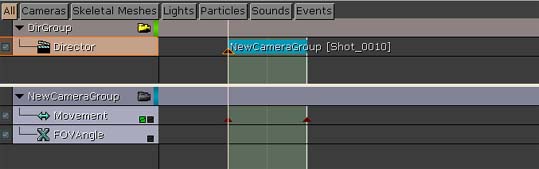
Right click the window under the word "All"
and select "Add New Camera Group"
(Make sure your camera is still selected.)
-
Edit the timeline track so it only goes for
1 second but any time will do but try to
make it no longer than 5 seconds if possible
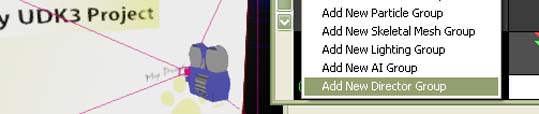
-
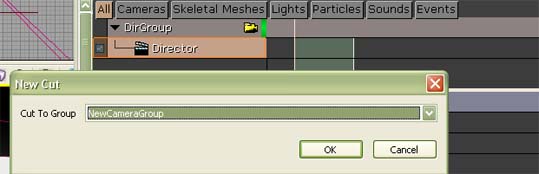
Right click the window again and select "Add
New Director Group".
-
Click in the green timeline window on the
right next to the word "Director"
This will highlight the word Director.
-
Press "Enter" on the keyboard.
-
Select "New Camera Group" in the drop
down list but not "Dirgroup"
because this is not selecting your camera.
-
Click OK. Exit Matinee and reselect the
Matinee widget but don't open it. Make sure
that you can see its properties. If you cannot,
select "Window" in the left top corner and
make sure "Properties" is ticked.
-
Put
a tick in the box called "Looping"
in the "Seq Act Interp" so
that the camera will play non stop or
without any interruptions
-
Connect the Level Loaded widget to the
Matinee widget
-
Reopen matinee by double clicking it
-
Play the matinee by clicking the play button
and try to edit/move the camera so it can
see all of the material texture you added.
-
Exit matinee, Right click the kismet window
and select, "New Action", "Toggle"
and select "Toggle Cinematic mode"
-
Connect the Level loaded widget to the "Enable"
option on the "Toggle Cinematic mode"
widget. This will stop any movement.
This is the camera set up and we are nearly
finished. This is also where you can make some
choices. You can have your matinee play for 5
seconds and then load your project after or have
it so spacebar or Esc key will load the next
level. Don't forget you will need to also Add
a player start in the middle of the cube you
created or the map will not load. Right click
the middle of the cube, select "Add Actor"
then select "Add Player Start".
|
|

Why don't you even try adding
special effects or maybe an introduction and
other misc options to make your project
impressive!
|
STEP
SEVEN
Let's review what we have done. 1st we created a
texture. 2nd we fixed a camera to it. 3rd we
created a matinee and 4th we stopped any
movement in the map. Cool....but why did we do
this?
For some reason, (maybe it is just the 2013
version of UDK only, I'm not sure of this), the
drivers don't fully load on the first start up
when using image and text widgets in kismet. So
what we have done is load a level first, then
loaded a second level which will successfully
display our menu. Perhaps there is an easier way
but at least this way works.
To
finish our level off you will need to connect
your matinee to a Console command or assign a
key to it. Below left is an example of how I
would personally set up a level. I won't go into details
because this tutorial is pretty big already.
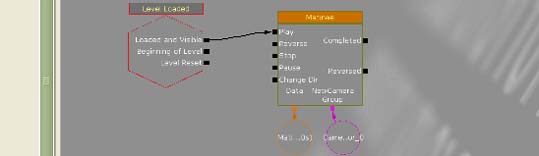
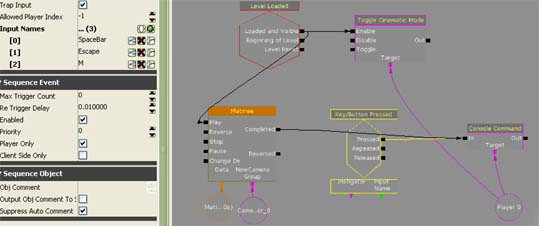
But, let
me describe it to you...
-
We have 5
widgets, Level loaded, toggle cinematic
mode, a 5 second matinee, a Key Button
Pressed widget with the Spacebar, M and Esc
assigned to it and a console command
-
The level
loads, it stops movement and runs the
matinee
-
If the Esc,
M or Spacebar keys are not
pressed, after 5 seconds, the main menu will
load via the console command because the
matinee has completed
-
If the Esc,
M or Spacebar keys are pressed,
the main menu will load and the 5 second
matinee is no longer valid
Console commands can be found in kismet under
New Action, Misc, Console Command.
Simply type "open" (without the quotes)
and the name of your level. Don't forget, after
the word "open" make sure you have a space, then
the name of your level. Have Fun!!!!
|
[Top]
______________________________________________________________________
 |
All software packages
created was used by the power of the
Unreal Development Kit. |
|
 |
In game loading screens
created by using BINK VIDEO. |
______________________________________________________________________
|
|
Comments on this site to:
feedback@worldofdasm.com
Date Modified:
10/09/2016
© World of DASM, and the DASM series, created by Shane Hillier
.
© 2013-2016 all rights reserved
|