Welcome to the world of DASM! For students who want to learn!
|
LINKS |
Save Game Tutorial Menu UPDATED 2018 |
|||
|
|
|
|
||
|
*PLEASE NOTE* Before starting this tutorial read below.
|
STEP ONE Introduction
This save/load game tutorial is as basic as I can possibly make it, step by step and it uses the The ultimate save system. Many tutorials expect you to have some basic knowledge of coding and other technical stuff so 90% of this is going to be done by me and 10% done by you. Don't panic though because this will be really easy to do and understand and I will do most of the work for you and if you set it up correctly I will even have maps already setup for you ready to go to edit for your project.
There are far better save systems than this one but I feel that this is easiest to show you and have you modify your save/load file through Kismet rather than coding which is difficult to learn.
One thing I did noticed with the Ultimate Save System is that it does not save the players location. So in this tutorial we trick the Ultimate Save System by attaching a trigger to the player and have it save the triggers location and direction instead.
This has been tested with two versions of UDK. (UDK 2013-07 & UDK 2012-05) and it worked flawlessly.
Special thanks to:
Crusha,[WuTz!] and Wormbo. You guys have done a great job and this is a real credit to you.
Thank you for helping the UDK community also.
*CAUTION ABOUT STRING VALUES!!*
A special thanks to our good friend Mr Nikolov for letting us know that there is an issue with string files that have the same name with the Ultimate saves system.
If you don't understand what I am talking about, the ultimate save system uses floats, strings and other various variables to store data with. You must keep in mind it is extremely important to give these unique names and not name something identical, even if it is under a different file name or "SeqVar _string".
If something does have the same name it will instantly override the previous file loaded and may or will give out the wrong information.
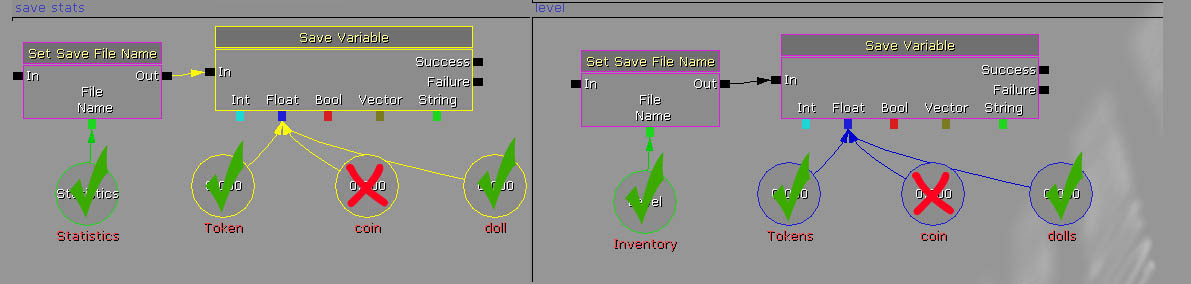
Below we have an example. We have one save file called Statistics and another called Level. (Which is covered by tick and marked as inventory in red writing.) The red writing is a name that the variable has been given. This must remain unique also so there can be no mix up or confusion.
So basically what I am trying to explain is try to have a unique File Name, description, float name and string name. For example, in the image below, we have two files named differently but they both have a float called coin. This will definitely cause a conflict and will not save or load your project correctly.
Though, if you purposely wanted these two save files above to save the coin and its data, you would have to have both files save simultaneously. Confused?.. Well basically if they do not save together it will only update the data on only one save file and not the other.
So like I said, isn't it much easier just to give all items a unique name?
Have fun!!
_______________________________________________________________
Ultimatesavesystem.dll file wont package in Frontend
I came across this problem myself. After some research I found a few different reasons. The main reason is that the .dll file needs to be certified before it is accepted. If a a .dll file has been certified it is sort of a guarantee that the .dll file won't contain malicious software and stuff like that. Also it adds information from where the .dll came from and who it is signed/certified to. Plus it costs $$$.
How do I get around it example 1
There are two ways you can get around this issue.
- Use another installer. For example, Inno.(It is free!)
- After install copy and paste the .dll file manually to where it is supposed to be into your UDK project "after it is installed."
Unfortunately using Inno will require you to understand some script code. I have supplied some code for you below. Just observe the text and you can actually understand that some parts of the text just guide Inno what to package. Where I have put "your details" or "your PC name" or "your game name" in the script, this means you change this code with your details and PC name etc.
To prepare your software for Inno, you will need to fully install your project first using Frontend and tell Inno after where your program is that you want to compress.
If there are quotes or even no quotes in parts of the script you must make sure that they are present when they need to be so don't accidentally delete them. Just remember also you may have installed UDK in another directory than mine so make sure the paths match.
There are two lines that I have added in the script from .txt files that I had on my desktop. These files were my license agreements and a thank you for installing my software. This is not necessary but it makes your installation look more professional. Example Below;
LicenseFile=C:\Documents and Settings\YOUR PC NAME\Desktop\license.txt
InfoAfterFile=C:\Documents and Settings\YOUR PC NAME\Desktop\Thank you.txtYou can create your own icons for your project too so if you wish to do this click HERE.
; Inno Script for UDK created by YOUR DETAILS
#define MyAppName "YOUR GAME NAME"
#define MyAppVersion "1.0"
#define MyAppPublisher "YOUR DETAILS"
#define MyAppURL "http://www.YOUR DETAILS.com"
#define MyAppExeName "UDK.exe"
[Setup]
; NOTE: The value of AppId uniquely identifies this application.
; Do not use the same AppId value in installers for other applications.
; (To generate a new GUID, click Tools | Generate GUID inside the IDE.)
AppId={{C49EAC95-A8E5-438B-AFFF-D322835A9871}
AppName={#MyAppName}
AppVersion={#MyAppVersion}
;AppVerName={#MyAppName} {#MyAppVersion}
AppPublisher={#MyAppPublisher}
AppPublisherURL={#MyAppURL}
AppSupportURL={#MyAppURL}
AppUpdatesURL={#MyAppURL}
DefaultDirName={pf}\{#MyAppName}
DefaultGroupName={#MyAppName}
LicenseFile=C:\Documents and Settings\YOUR PC NAME\Desktop\license.txt
InfoAfterFile=C:\Documents and Settings\YOUR PC NAME\Desktop\Thank you.txt
OutputDir=C:\Documents and Settings\YOUR PC NAME\Desktop
OutputBaseFilename=YOUR GAME NAME
SetupIconFile=C:\UDK\YOUR GAME NAME\Binaries\InstallData\GameIcon.ico
UninstallDisplayIcon=C:\UDK\YOUR GAME NAME\Binaries\InstallData\Uninstall.ico
Compression=lzma
SolidCompression=yes
[Languages]
Name: "english"; MessagesFile: "compiler:Default.isl"
Name: "brazilianportuguese"; MessagesFile: "compiler:Languages\BrazilianPortuguese.isl"
[Tasks]
Name: "desktopicon"; Description: "{cm:CreateDesktopIcon}"; GroupDescription: "{cm:AdditionalIcons}"; Flags: unchecked
Name: "quicklaunchicon"; Description: "{cm:CreateQuickLaunchIcon}"; GroupDescription: "{cm:AdditionalIcons}"; Flags: unchecked; OnlyBelowVersion: 0,6.1
[Files]
Source: "C:\UDK\YOUR GAME NAME\*"; DestDir: "{app}"; Flags: ignoreversion recursesubdirs createallsubdirs
; NOTE: Don't use "Flags: ignoreversion" on any shared system files
[Icons]
Name: "{group}\{#MyAppName}"; Filename: "{app}\Binaries\Win32\{#MyAppExeName}" ; IconFilename: "{app}\Binaries\InstallData\Gameicon.ico"
Name: "{group}\{cm:UninstallProgram,{#MyAppName}}"; Filename: "{uninstallexe}" ; IconFilename: "{app}\Binaries\InstallData\Uninstall.ico"
Name: "{group}\{cm:ProgramOnTheWeb,{#MyAppName}}"; Filename: "{#MyAppURL}"; IconFilename: "{app}\Binaries\InstallData\Gameicon.ico"
Name: "{commondesktop}\{#MyAppName}"; Filename: "{app}\Binaries\Win32\{#MyAppExeName}"; IconFilename: "{app}\Binaries\InstallData\Gameicon.ico" ; Tasks: desktopicon
Name: "{userappdata}\Microsoft\Internet Explorer\Quick Launch\{#MyAppName}"; Filename: "{app}\{#MyAppExeName}"; Tasks: quicklaunchicon
[Run]
Filename: "{app}\Binaries\Win32\{#MyAppExeName}"; Description: "{cm:LaunchProgram,{#StringChange(MyAppName, '&', '&&')}}"; Flags: nowait postinstall skipifsilentHow do I get around it example 2
The other option is not what I would recommend but if you have created your own software and want it to work on another PC, you can simply copy the save files into the install.
You need to go into your UDK directory:
C:\UDK\UDK-2012-05\Binaries\Win32\UserCode
COPY THIS FILENAME: UltimateSaveSystem.dll
You now need to go into this directory:
C:\PROJECTS_NAME\Binaries\Win32\UserCode
PASTE THIS FILENAME: UltimateSaveSystem.dll
(The directory above are default directories. Yours may differ depending on where you did your UDK install. Also, where is says "Projects_Name, this is supposed to represent the name of your game.)
Then copy any shortcuts to your project on your desktop or programs list and paste them inside your project folder so you can run the game from that icon. (Don't forget to do this because it saves a lot of problems.)
Now from here, if you want to transfer your project especially if it is just for testing, I would just winzip or zip the project folder and copy the zipped file to a disk or external drive. Then "unzip" or extract the project on another Pc or whatever and it will or should work.
From memory I don't think it needs registry files for it to run but you will need to locate the icon you pasted in the project folder to run your project or you will have problems locating the exe to run it.
_______________________________________________________________
Packing External Files within UDK that you added.
You have finished your project and now it's time to pack it. The problem is that you added some files but they won't pack in Frontend. Here's how.....
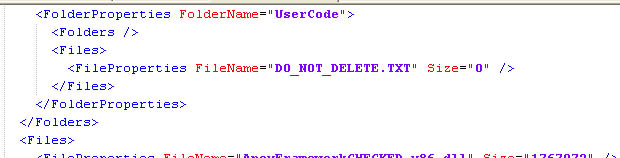
In your folder C:\UDK\UDK-2013-07\Binaries\InstallData (Example only your install may differ..) is a file called: Manifest. (XML file.) This is the file that needs to be modified so locate it now but don't open it yet. Now, in your UDK\UDK-2013-07\Binaries folder create a text document of some type, notepads fine, and call it "test" and type in "This is a test" and save it. Add any text you like but make sure it is something or this tutorial won't look so cool.
Open the Manifest.xml file in your UDK\UDK-2013-07\Binaries\InstallData folder. Type in "UserCode" in the search engine of the text editor. This will locate the "UserCode" installation folder (Examples below.)
|
|
|
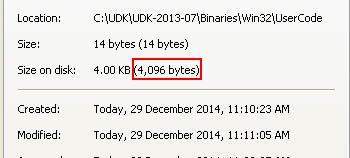
Make sure that the file size is the same, no dots or comma's, just 4096 that's it. If your text file is larger than mine type in it's actual size. This is an example only. |
|
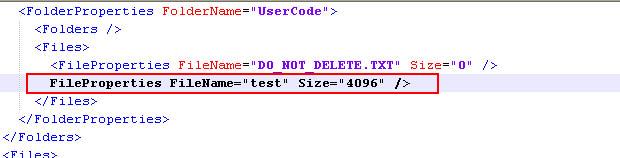
This is what I currently have in my Manifest list install above for the folder "Usercode". Yours may vary so don't panic. Add the text line highlighted left. Make sure the file size matches the file size of your document. |
 |
Save and exit the text editor. To test this you will need to pack a game using Frontend. Once you have done this install the file you packed on your PC or whatever device your using and open the folder called "UserCode" Your text document called "test" should be in there along with the text you added.
So basically this is how you add external files which modify UDK in some way. When you add meshes and sounds you don't have to do this because UDK does this for you already. So don't go into your manifest list and add stuff that really does not have to be there. If you type in the wrong file size in the list it won't install your file either so be sure everything matches.
Also, when modifying your Icons for your project you will have to modify the size of the files here too if they change.
Just type in the name of the folder that has the icons in it while editing the file with a text editor(UDK\UDK-2013-07\Binaries\InstallData), and change the file size. What I normally do is never rename something that I have modified but rather just change the file size and save over the top of the old file.
REMEMBER TO BACKUP ANY FILES BEFORE MODIFYING THEM......ok?
Good Luck!!
______________________________________________________________________
Windows 10 Ultimatesavesystem fix! NEW
Hello people! I have received an e-mail from a good friend called Mr Nikolov and he has provided me with a fix for anyone who installs DASM Spell Quest and the save files won't or don't work.
Here is how it goes:
Windows 10 users by default have on the system Microsoft .NET Framework 4 or 4.5 and up. But for the save system to work, windows 10 users will have to install, Microsoft .NET Framework 3.5 and possibly after that install the Microsoft .NET Framework 3.5 service pack 1 and the save system will work once more!!
If you are still having some issues after installing these programs please provide us with any information possible to help resolve any issues you may be having. Below we have provided some links that may help you resolve any issues.
Microsoft.NET 3.5 Windows 10 help files.
https://answers.microsoft.com/en-us/insider/forum/insider_wintp-insider_install-insiderplat_pc/how-to-instal-net-framework-35-on-windows-10/450b3ba6-4d19-45ae-840e-78519f36d7a4https://docs.microsoft.com/en-us/dotnet/framework/install/dotnet-35-windows-10
https://support.na.sage.com/selfservice/viewContent.do?externalId=63629&sliceId=1
http://www.tomshardware.com/forum/id-2927688/net-framework-install-windows.html
YouTube. Installing Microsoft.NET 3.5 on Windows 10
https://www.youtube.com/watch?v=PXOQML94Gvchttps://www.youtube.com/watch?v=ZHzulOODC2w
Microsoft.NET 3.5 official download links:
https://www.microsoft.com/en-au/download/details.aspx?id=21https://www.microsoft.com/en-us/Download/confirmation.aspx?id=25150
Thanks!
______________________________________________________________________
All software packages created was used by the power of the Unreal Development Kit.
In game loading screens created by using BINK VIDEO. ______________________________________________________________________
[Top]


Comments on this site to: feedback@worldofdasm.com
Date Modified: 04/06/2018
© World of DASM, and the DASM series, created by Shane Hillier
.
© 2013-2018 all rights reserved